 Editor’s Note: I spent the better part of November 2022 through May 2023 working on a revamp of the NOLS Rock Climbing Educator Notebook. While there was some significant editing of existing content the final product was 87,451 words, 125 pages and numerous new illustrations and photos. Maybe I should sit down and write about what the process of writing was like, but that almost seems too heady. . . Maybe someday. But for now, here is an excerpt from the notebook. It has been formatted to fit into this medium; the text and layout differ from the spiral bound paper copy. Additionally, I definitely could not have done it without the help of so many people. Scroll to the bottom to find that list of acknowledgements
Teaching Anchor Cleaning
OBJECTIVE
Students will be able to:
- Explain the steps and communication for cleaning gear from a fixed anchor at the top of a climb.
- Know which factors mean a climber can lower and when they need to rappel.
- Clean a fixed anchor using a rappel descent (if applicable).
CONSIDERATIONS FOR INSTRUCTOR CONSISTENCIES
- Getting the instructor team on the same page for coaching and techniques.
- How many times will student anchor cleaners demonstrate competency on the ground before applying skills in the vertical?
- What are acceptable methods of supervising students while they are practicing in the vertical? Will this change over time? If so, how and when?
- What are the expectations for different anchor types (e.g., widely-spaced rappel rings, drop-in style lower-offs, or single quick links through webbing)?
- There are a number of different ways to teach cleaning anchors, and there are pros and cons to each method. Teaching a method that will work well for the course area before teaching alternates can help eliminate confusion.
- Are instructors going to use the same methods of cleaning that students have been taught? If not, what is the reasoning behind a different method and is it something that could be added into the curriculum?
TEACHING CONSIDERATIONS
In frontcountry settings, teach this early. As noted in Chapter 1, one of the learning objectives for students is “being able to build, evaluate, and retrieve climbing anchors.” This high-consequence activity improves with ample practice and application time, and along with belaying a leader, it moves student climbers toward a higher level of skill. It’s an empowering exercise for new climbers, but the consequences of a simple mistake can be severe!
PLANNING
This class is very technical and precise. While there are a lot of different ways to do it correctly, students will be performing this skill set in a highly exposed environment—potentially without instructors close by—so instruction needs to be concise and specific. As an instructor team, discuss language and steps and walk through the class a few times before teaching.
Decide how many times students will practice anchor cleaning on the ground before taking it vertical. What does an acceptable “practice run” look like? Two or three clean runs on the ground is a good starting point.
Review the “Monitoring Students” section below and coach each other as needed. Knowing the types of fixed anchors the course will encounter can determine which techniques to emphasize.
TEACHING
Anchors vary significantly, both at NOLS and after, so it’s impossible to teach every eventuality. It’s important that new climbers know there’s a lot they don’t know. Coach situational awareness. While there are other factors (group culture, etc.) that may play into a person being willing to admit they haven’t seen an anchor type before, recognizing a new situation is an essential ingredient.
Communication is paramount. Teach students to communicate plans before they leave the ground. If applicable (e.g., lowering), coach the belayer to never take the climber off belay and teach the climber to never say, “Belay off.” For students who’ve had a class on multi-pitch belay commands, point out the similarities, including that the belayer shares responsibility for appropriate communication.
When teaching, write the steps on a whiteboard and keep it near the practice station as a reference if students forget a step. If areas where drop-ins or lower-offs are common, do a demo or class that highlights that process.
In many areas where NOLS operates, lowering on fixed gear (not just drop-ins) is standard, so it’s important to teach students what makes an anchor appropriate for lowering. If ethics are incorporated, students can make more informed choices in the future. This could be an adaptive discussion separate from the anchor cleaning class.
PRACTICE
Bolt boards: bring as many bolt boards as practical on the course. They can be used for anchor building, anchor cleaning, multi-pitch anchor management demonstrations, and rescue practice—all from the confines of camp, the side of a truck, or the base of a crag (without using vertical terrain).
Ropes: bring several short sections (30-40 feet or 9-12 meters) of dynamic rope. Practicing bolt board-related skills with these simplifies rope management and keeps ropes cleaner. If dynamic ropes aren’t practical, anchor statics also work, though they aren’t as supple.
DOING
Before students clean an anchor on a cliff, consider a practice run on the ground, especially if they did their initial practice sessions the night before. As students gain competence, a verbal run-through could be sufficient.
Instructor knowledge of the fixed anchor setup helps with coaching from afar. While students are learning to clean anchors, instructors need to monitor them by being at the top of the cliff with them or at the top of another climb nearby. Alternatively, instructors may sometimes monitor students from the ground with binoculars. See “Monitoring Students” below.
If students are rappelling, they have to have a backup.
BACKCOUNTRY THOUGHTS
On backcountry courses, create simulation stations in trees or with gear on the rock. Fixed anchors in the Winds usually aren’t bolted, so consider teaching an anchor cleaning progression that involves rappelling: using existing focal points/masterpoints, students transition to a rappel instead of lowering off. Alternatively, tape the carabiners shut to replicate something that needs to be threaded through or add two carabiners to the focal point to simulate drop-ins. It isn’t easy to teach this without context or bolt boards, but getting creative can help. Supplement with pictures of bolted anchors from this notebook or other library materials. Although heavy, it’s also possible to send in a bolt and hanger at a re-ration for hands-on understanding.
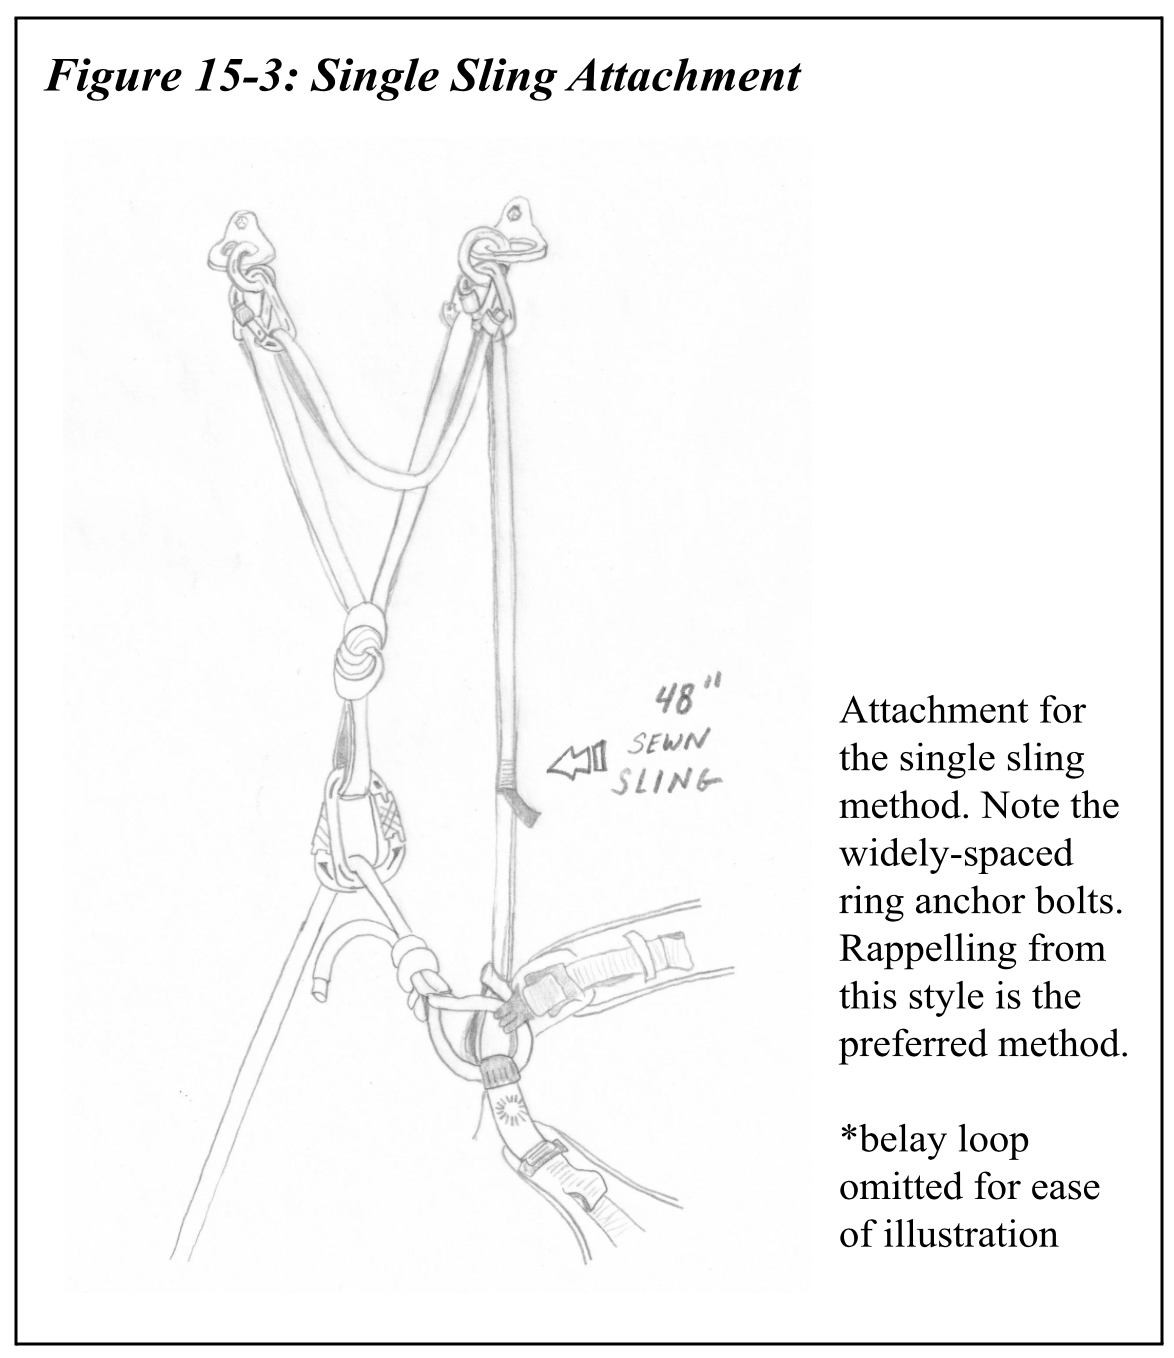
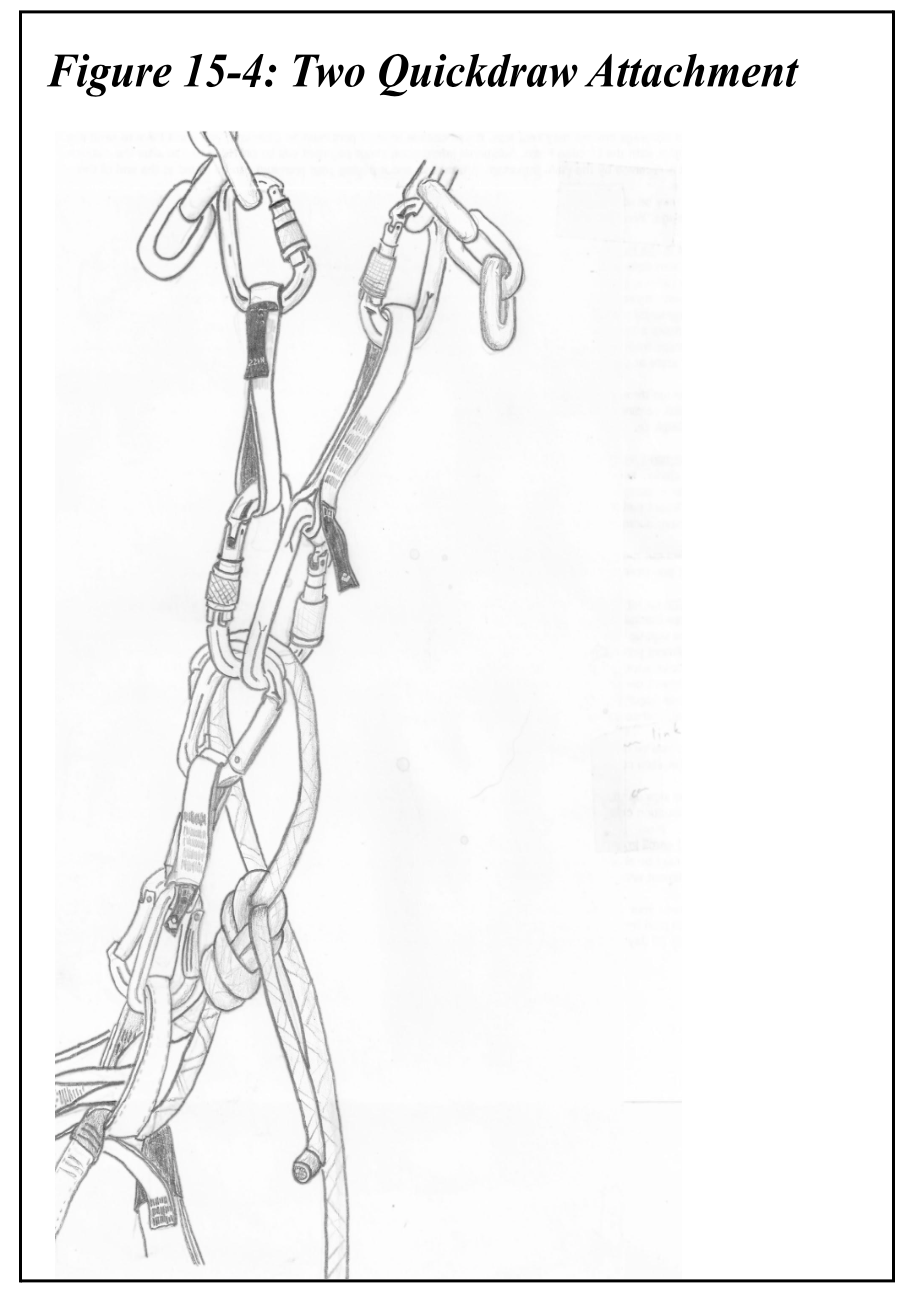
In “Information Breakdown” below, two attachment methods are highlighted: the two quickdraw method and the 48-inch (120 cm) sling method. Both can be used to rappel or lower off. There are also two different “rethread” methods. They are interchangeable, meaning Attachment Method A can also be used with Rethread Method B. Discuss among the instructor team before teaching for consistency.
SAMPLE CLASS OUTLINE
ANCHOR CLEANING
- Objective: Introduce students to a progression for cleaning gear from a fixed anchor at the top of a climb.
- Materials: Bolt board, short section of climbing rope (with rope tarp), appropriate anchor setup for bolt board, anchor cleaning materials (i.e., two quickdraws or two sewn slings with carabiners), whiteboard, harness, and a belayer with a harness belay device.
- Time: Class–30 minutes; practice–about 15 minutes per person.
- Setup: Ideally, hang the bolt board so it will hold body weight. Set up a teaching board with listed steps. Build an anchor and put a top rope through the masterpoint. Seek a student belayer. Be tied in and ready.
- Hook/Structure/Progression:
- Accident data from the American Alpine Club over the past 30 years shows lowering accidents are increasing. Pull a sample from an Accidents in North American Mountaineering (ANAM) or if you have an applicable story, start with that.
- Review and describe the steps on the whiteboard.
- Do a check (emphasize checking for the right setup and equipment), communicate a plan (with the belayer), climb, and attach to the anchor.
- Work through the steps slowly, so students can understand the process. (The goal isn’t to wow with efficiency.)
- Back on the ground, say, “Belay off” before asking for questions.
- Repeat the process, but give each student an assigned step (it’s fine if they read it off the whiteboard) and let them guide the progression. Take questions along the way, and if something is rabbit hole-y, wait until the demo is done to address it.
- Notes: There are many ways to peel the lime here, so practicing this class before teaching it pays dividends, particularly if the system is different from usual systems.
INFORMATION BREAKDOWN
UNIVERSAL STEPS
Step 1: Prepare and Plan
This step happens on the ground. Coach students to make a plan, tell their partner, and collect the necessary gear. How many experienced climbers have gotten to the top and said, “Oh poop, I forgot something to clean with!” [sheepish hand raise emoji]. Verbalizing the plan helps partners prepare and check each other. Instructors can better supervise attachment systems assembled on the ground.
Step 2: Anchor Attachment (Where and How)
Figure 15-2 highlights the pros and cons of two different methods. In the two quickdraw method (Figure 15-4 ), the climber clips two opposite quickdraws from their belay loop to the masterpoint carabiners. In the 48-inch (120 cm) sling method (Figure 15-3), the climber girth hitches a 48-inch sling to the tie-in points, puts an overhand knot mid-way up, and clips a locking carabiner around the overhand. They put another locker on the end of the sling. The climber clips each locker into a bolt hanger, starting with the closest locker and bolt. The same setup is often used for rappelling (Chapter 14).
Figure 15-2: Attachment Method Pros and Cons
| Method | Pros | Cons |
|---|---|---|
| Two Quickdraws |
|
|
| 48-inch Sling |
|
|
Diving into what makes a quality attachment point (on the fixed gear) can be a good 201 level discussion. In general, any part of the fixed system is appropriate to attach to, but attaching to the lowering point (end link on a chain or where the rope will go) can create complications when transferring the load. Attaching to open cold shuts (see Figure 11-1 for a cold shut without a gate, though the bolt in that photo isn’t good) could be catastrophic if there’s significant upward movement. Hangers, quick links, chain sections, and steel rings can be appropriate points.
Step 3: Transfer the Load
Accidents can happen when the load is transferred to a new system.
Once the climber is at the top and the tether is attached, they yell down, “Slack, Leroy!” and the belayer responds with an armload of slack and “Thank You, Emma!” The climber assesses their attachment to the system under load, including looking at and physically checking correct attachment points and carabiners. Just looking at and feeling tension can be misleading. (Note: If the climber plans to rappel, once they have slack and have checked the system under load, they yell to the belayer, “Belay off, Leroy!”)
Step 4: Secure the Rope
Once the load is transferred to the tethers, the climber pulls up another armload or three of slack (asking for it, if needed) and clove hitches the rope to a carabiner on their harness so they don’t drop the rope. This step isn’t needed with the bight pass method, but teaching it supports good habits. This applies to rappelling and lowering.
Step 5: The Rethread
At this point, there are several ways to proceed, whether lowering or rappelling. The table below (Figure 15-5) highlights the pros and cons of two different rethread options, the bight pass and untie-retie.
Bight Pass
- Pass a bight of climbing rope through the lowering points.
- Tie a figure eight-on-a-bight and clip it to the belay loop with a locking carabiner.
- Untie the figure eight follow-through, pull the tail through the fixed point, and lower off.
Untie-Retie
- Untie the figure eight.
- Pass the end through the lowering points.
- Retie the figure eight follow-through and lower off.
For rappelling, the climber unties, feeds the single strand through the rappel point(s), puts a knot in it, and pulls it through until the middle is reached or both ends are on the ground. Many variations exist. A few are addressed later in the chapter.
Figure 15-5: Rethread Methods
| Method | Pros | Cons |
|---|---|---|
| Bight Pass
Lower |
|
|
| Untie-Retie Lower |
|
|
Step 6: Weighting the System
THIS STEP CHECKS THE SYSTEM! This is where accidents happen.
Untie the clove hitch that keeps the rope from dropping. Ask for tension so that all the weight is back on the climbing rope. Coach students to use hands and body positioning to move upward as opposed to letting the belayer pull in slack to take their weight. This loads the new system before tethers are unclipped and allows for clearer assessment of tension or slack in appropriate places.
Verify the knot is tied through two points or clipped to the locking carabiner and the rope is running through two lower-off points. Competence in belay checks allows an efficient transfer of knowledge to this new, exposed, high-consequence activity.
Step 7: The Clean
Clean top-roping equipment from the fixed anchor. If the attachment is at a point other than the masterpoint (hanger, chain, quicklink, etc.), this step can happen earlier (after step three), which eliminates the challenge of cleaning a system that’s underneath a weighted system.
For a more secure transfer of equipment to the harness, attach the focal point/masterpoint to the belay loop or a gear loop, then clean the gear on the hangers. If the masterpoint is the primary point of attachment, cleaning and letting it dangle is efficient and effective.
Step 8: The Descent
Lower to the ground after cleaning equipment.
MONITORING STUDENTS
When students are practicing in high-consequence terrain, close supervision is expected. The first few times students practice these skills, an instructor needs to be close by to observe and coach. The instructor team needs to decide how students can demonstrate competency for decreased supervision. Typically, an instructor watches a student run through the process on the ground and demonstrate understanding (if they get the order of operations wrong, they problem solve effectively or realize they need to start again) two or three times before they go vertical.
Methods:
- Walk around and observe, appropriately tethered, from the top. This works well on backcountry courses, where someone can go through the cleaning process but leave the anchor.
- Climb a nearby route, possibly a middle route to observe two or more students at a time.
- Climb the route to be cleaned. Doing this in the best way for the student takes a bit more work on the instructor’s part. Climb the route, tether into a bolt, obtain an out-of-the-way position, then go off belay. Pull the rope through the masterpoint until there’s enough to reach the ground, untie the figure eight, and toss the rope back down. The student climbs the route and runs through the process unobstructed. Once the student is back on the ground, rappel down the rope before it’s pulled. If another student is on a nearby route, the instructor can observe two or more students at once.
- Climb a route to access a ledge from which many routes can be observed. Consistent modeling of appropriate tethering and situational awareness is important.
- Binoculars or visuals from the ground. This works well once students have cleaned a couple anchors with close supervision and can talk through their steps with an instructor on the ground or nearby.
THE RAPPELLING METHOD
Teaching rappelling as a way to clean routes can support greater independence post-NOLS. Though it was once taught as the primary way to descend from single-pitch climbs, it has now been relegated to an add-on to most anchor cleaning classes. Rappels have additional opportunities for critical errors (e.g., rappel device misthread or communication errors—a number of people have died or been seriously injured from being taken off belay). They’re also more complicated and time-consuming.
As sport climbing has become the dominant form of climbing, lowering off has become common at most crags. Knowing when and how to rappel is still important, particularly as newer climbers venture further afield and into less popular climbing areas or areas with different ethics. (Lowering from climbs speeds the wear and tear on gear that is expensive and challenging to replace.) Things to consider:
Reasons to Rappel
- The lowering point has questionable grooves, aluminum rappel rings (look for a circumferential thin groove around the ring), or thin rings. Rappelling reduces wear.
- The rappel (rap) rings are spread out. Lowering off them will kink the rope. Fixe Rappel Rings (Figure 15-3) and Metolioius Rap hangers (Figure IV-6 in Appendix IV) will kink the rope a lot (to the point where later someone may accidentally release a brake hand to deal with kinks). Rappelling through these is strongly preferred.
- There are no rap rings, mallions, etc., just webbing or cord as a masterpoint. If on a NOLS course—or heck, in non-NOLS climbing, too—leave a carabiner (or two) there.
- The belayer has other tasks to do.
- There is a task on descent (such as cleaning stuck gear) that could take time. Rappelling frees up the belayer.
- Except for severe overhangs or traversing climbs where gear needs to be cleaned, rappelling works on almost every climb.
Reasons to Lower
- Drop-in anchors designed for lowering: carabiners (or carabiner-like hooks/clips), open or gated cold shuts, etc.
- The lowering points are convergent (not spread out).
- The local practice is to lower off at the end of use, though typically, it’s good practice to top rope through a climber’s gear versus the fixed gear.
- The lowering main point is steel construction or an aluminum carabiner (not an aluminum ring).
Rigging the rappel can be straightforward. Untie, thread the rope through the rappel point, tie a knot in rope end, untie the clove hitch backup, and continue pulling slack through. Once the middle has been reached or verbal or visual confirmation has both ends on the ground, rig the rappel.
If using a firefighter’s belay, the rappel device on the belay loop is fine. Otherwise, rig an extension and a third hand before transferring the load and cleaning the anchor. See Chapter 14 for more on loading and weight transfer. Monitoring students as they do this is the same as for lowering.
NOW WHAT?
As all instructors and situations are unique, there is no one right answer. Be considerate of how personal experience and social group membership (e.g., gender or nationality) might shape people’s answers to these questions and scenarios.
Scenario #1: You’re working a backcountry rock course and a student is really keen on learning how to clean fixed anchors. How can you help make that happen for them?
Scenario #2: As a new course leader, you feel attached to how this class is taught. You had near misses on a couple recent courses and have a heightened awareness of students (and instructors!) making mistakes. But a first-time instructor is excited to teach the class, and you want to empower them. What are ways you can do so?
Question: What role does this skill set play in helping students see themselves as climbers? How can we elevate this above physical ability on the rock?
Featured Image: illustrating the CEN was an added joy that I hadn’t expected; here illustrations and supplies are spread on the table in Vermont.
Acknowledgements:
Many people within the NOLS community contributed to this version of the CEN. Current edition by Jared Spaulding, with guest sections by Galen Wilder and Drew Leemon. Previous editions are by David Anderson, Micheal Cheek, Josh Beckner, Sarah Hueniken, Jim Richards, and Dave Bragg. Martin Arteaga, Will Baker, Josh Beckner, Phoebe Bright, Minu Chae, Kathleen Chandler, Elena Chin, Jeremy Cronon, Gary Cukjati, Cora the Dog, Jodie Darensbourg, Anna Haegel, Henry Haro, Matt Hartman, Eddy Kim, Jerick Lee, Drew Leemon, Patrick McHeyser, Keshet Miller, Andy Notopoulos, Katie Oram, Tim Parker, Gabo Puma, Jesse Quillian, Jen Sall, Leonardo Rivas Dominquez, Shannon Rochelle, Joy Seward, Clair Smith, Ian Smith, Jackie Smith, Anne Nelson Stoner, Zach Taylor, Jose Luis Troncoso, Liz Tuohy, and Galen Wilder provided valuable suggestions and editing. All photos by Jared Spaulding unless otherwise noted. Layout by Phoebe Bright. Edited by Phoebe Bright.
Additionally, thanks to everyone who graciously let me use their images to highlight learnings and provide course area imagery.
Be First to Comment